Php How Monitor File Upload Progress With Fastcgi Turned on
On this page
- Displaying Upload Progress With nginx On Debian
- 1 Installing nginx-extras
- 2 Configuring Your Vhost
- 3 Edifice An Upload Course
- 4 Links
Displaying Upload Progress With nginx On Debian
This tutorial shows how to use the nginx upload progress module to upload ane or multiple files and display an upload progress bar for the user. This is useful, for instance, if users upload large files, and so that they know that something is going on in the background.
I do non issue any guarantee that this will work for yous!
1 Installing nginx-extras
The nginx upload progress module isn't enabled by default. Yous tin can run
nginx -V
to check if it is enabled - yous should then seen something like --add together-module=/tmp/buildd/nginx-i.4.four/debian/modules/nginx-upload-progress in the output. If information technology's non enabled, install the nginx-extras package:
apt-get install nginx-extras
Afterward, run
nginx -V
again - the upload progress module should at present announced in the output:
[email protected]:/var/www# nginx -V
nginx version: nginx/i.4.four
TLS SNI support enabled
configure arguments: --prefix=/usr/share/nginx --conf-path=/etc/nginx/nginx.conf --error-log-path=/var/log/nginx/fault.log --http-customer-body-temp-path=/var/lib/nginx/body --http-fastcgi-temp-path=/var/lib/nginx/fastcgi --http-log-path=/var/log/nginx/access.log --http-proxy-temp-path=/var/lib/nginx/proxy --http-scgi-temp-path=/var/lib/nginx/scgi --http-uwsgi-temp-path=/var/lib/nginx/uwsgi --lock-path=/var/lock/nginx.lock --pid-path=/run/nginx.pid --with-pcre-jit --with-debug --with-http_addition_module --with-http_dav_module --with-http_flv_module --with-http_geoip_module --with-http_gzip_static_module --with-http_image_filter_module --with-http_mp4_module --with-http_perl_module --with-http_random_index_module --with-http_realip_module --with-http_secure_link_module --with-http_spdy_module --with-http_stub_status_module --with-http_ssl_module --with-http_sub_module --with-http_xslt_module --with-ipv6 --with-mail --with-mail_ssl_module --add-module=/tmp/buildd/nginx-i.4.4/debian/modules/headers-more-nginx-module --add-module=/tmp/buildd/nginx-1.iv.4/debian/modules/nginx-auth-pam --add-module=/tmp/buildd/nginx-ane.four.four/debian/modules/nginx-enshroud-purge --add-module=/tmp/buildd/nginx-1.four.4/debian/modules/nginx-dav-ext-module --add-module=/tmp/buildd/nginx-ane.4.4/debian/modules/nginx-development-kit --add-module=/tmp/buildd/nginx-ane.four.4/debian/modules/nginx-echo --add together-module=/tmp/buildd/nginx-one.4.4/debian/modules/ngx-fancyindex --add-module=/tmp/buildd/nginx-1.4.4/debian/modules/nginx-http-push button --add-module=/tmp/buildd/nginx-ane.four.four/debian/modules/nginx-lua --add-module=/tmp/buildd/nginx-1.4.four/debian/modules/nginx-upload-progress --add-module=/tmp/buildd/nginx-1.4.four/debian/modules/nginx-upstream-fair --add-module=/tmp/buildd/nginx-1.4.4/debian/modules/ngx_http_substitutions_filter_module
[electronic mail protected]:/var/world wide web#
To activate the module, we demand to create a small zone in nginx.conf (in the http {} container) that is used to track uploads (I proper noun the zone uploads in this instance):
vi /etc/nginx/nginx.conf
[...] http { [...] # reserve 1MB under the name 'uploads' to track uploads upload_progress uploads 1m; [...] } [...] Reload nginx afterwards:
/etc/init.d/nginx reload
2 Configuring Your Vhost
Now open your vhost configuration file and put the post-obit inside the server {} container (if you lot use ISPConfig, put this in the nginx Directives field of the website):
[...] client_max_body_size 100M; location = /upload.php { try_files $uri =404; include /etc/nginx/fastcgi_params; fastcgi_pass unix:/var/lib/php5-fpm/web1.sock; fastcgi_index index.php; fastcgi_param SCRIPT_FILENAME $document_root$fastcgi_script_name; fastcgi_intercept_errors on; ## Track uploads for this location on the zone defined ## above with a 60 seconds timeout. track_uploads uploads 60s; } location ^~ /progress { upload_progress_json_output; report_uploads uploads; } [...] In my case the file that processes the uploads (i.eastward., the file in the action aspect of the HTML upload class) is called upload.php and resides in the document root. If your file is named differently, adapt location = /upload.php { accordingly. Also make certain you use the correct fastcgi_pass options for your website (yous volition probably use another socket than the one I'one thousand using here, or yous are using TCP connections instead of sockets).
In the track_uploads line information technology is important that y'all employ the name of the upload_progress zone from chapter 1 (uploads in this case).
The location ^~ /progress {} container has to be taken literally, which ways don't change it (well, y'all should alter the report_uploads line if your upload_progress zone isn't named uploads). This location will be used to poll nginx for the condition of the file uploads.
Reload nginx afterwards (unless you use ISPConfig which does the reload for you):
/etc/init.d/nginx reload
3 Building An Upload Grade
Next nosotros need an upload course with some JavaScript that polls the progress location during uploads. My file looks similar this - name it alphabetize.html, upload.html, etc. and put it in your document root:
<!DOCTYPE html PUBLIC "-//W3C//DTD XHTML 1.1//EN" "http://www.w3.org/TR/xhtml11/DTD/xhtml11.dtd"> <html xmlns="http://www.w3.org/1999/xhtml" dir="ltr" xml:lang="de"> <caput> <title>nginx Upload Progress</title> <style> body { font-family: arial; font-size: 11px; } #statbar_box { width: 500px; meridian: 20px; groundwork-color: #FFF; position: relative; text-align: center; margin-lesser: 12px; brandish: none; edge-radius: 4px; } #statbar_bar { position: absolute; pinnacle: 20px; top: 0px; background-color: darkred; text-align: center; z-alphabetize: 100; border-radius: 4px; } #status { margin-bottom: 12px; text-align: heart; width: 500px; } iframe { width: 500px; tiptop: 30px; margin-bottom: 12px; position: accented; top: -300px; } #footer { text-align: center; width: 500px; background: #ddd; padding: 5px; border-radius: 4px; } #base { width: 500px; padding: 20px; background: #EFEFEF; edge-radius: 4px; position: relative; margin: auto; } </style> <script src="http://code.jquery.com/jquery-1.eight.three.min.js" type="text/javascript"></script> <script blazon="text/javascript"> (function ($) { var interv; var test = 1; var statbarWidth; $(certificate).ready(part () { statbarWidth = $("#statbar_box").width(); $("#upload").submit(role () { /* generate random progress-id */ uuid = ""; for (i = 0; i < 32; i++) { uuid += Math.floor(Math.random() * 16).toString(16); } /* patch the form-activeness tag to include the progress-id */ $("#upload").attr("action", "/upload.php?X-Progress-ID=" + uuid); $("#statbar_bar").css("width", "1px"); $("#statbar_box").fadeIn(500); $(this).disabled = fake; interv = setInterval(function () { progress(uuid) }, 800); }); }); var firststart = truthful; function progress(uuid) { $.getJSON("progress", {"Ten-Progress-ID": uuid}, function (data) { console.log(data); if (data.country == 'done') { clearInterval(interv); $("#status").html('100%'); $("#statbar_bar").breathing({"width": statbarWidth + "px"}).animate({"width": "1px"}, 400, function () { $("#statbar_box").fadeOut(500); $("#status").html('0%'); }); } var prozent = Math.circular((information.received * 100) / data.size); prozent = !prozent?0:prozent; var pixel = Math.circular((prozent * statbarWidth) / 100); $("#condition").html(prozent + '%'); firststart = simulated; $("#statbar_bar").breathing({"width": pixel + "px"}); }); } })(jQuery); </script> </caput> <body> <div id="base of operations"> <?php print '- Max. Postsize: ' . ini_get('post_max_size'); print '<br>'; print '- Max. Uploadsize: ' . ini_get('upload_max_filesize'); ?> <div id="status">0%</div> <div id="statbar_box"> <div id="statbar_bar"></div> </div> <iframe src="upload.php" name="hidden_upload" frameborder="0"></iframe> <form id="upload" action="upload.php" target="hidden_upload" method="post" enctype="multipart/form-information"> <div id="footer"> <input type="hidden" name="MAX_FILE_SIZE" value="30000000" /> <input type="file" name="uploader[]"/> <input type="file" proper noun="uploader[]"/> <input type="submit"/> </div> </form> </div> </body> </html> Adjacent put the following upload.php in your document root:
<?php if(is_array($_FILES['uploader']['proper name']) && !empty($_FILES['uploader']['name'])){ for($i=0;$i<sizeof($_FILES['uploader']['name']);$i++){ move_uploaded_file($_FILES['uploader']['tmp_name'][$i], 'cache/'.$_FILES['uploader']['name'][$i]); echo "File ".$_FILES['uploader']['name'][$i]." uploaded successfully.<br>"; } } ?> upload.php stores uploaded files in a directory chosen cache, so don't forget to create that directory in your document root and give it the proper permissions then that PHP can write to it.
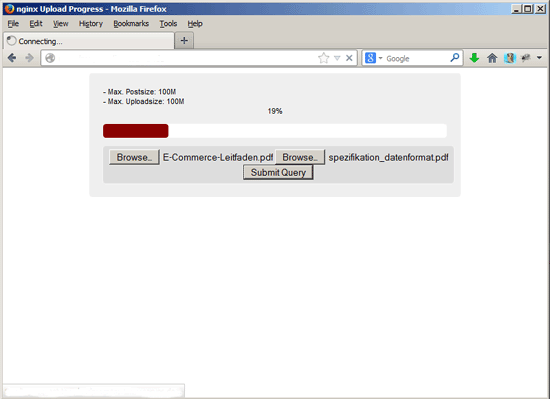
That'southward it. You tin now phone call the file with the upload form in your browser and try to upload some files:
iv Links
- nginx Upload Progress Module: http://wiki.nginx.org/HttpUploadProgressModule
- nginx: http://nginx.org
- Debian: http://world wide web.debian.org
Suggested manufactures
This feature is only available to subscribers. Get your subscription here.
Source: https://www.howtoforge.com/displaying-upload-progress-with-nginx-on-debian-wheezy
0 Response to "Php How Monitor File Upload Progress With Fastcgi Turned on"
Post a Comment